
(Sorry about the page loading time for this. There are a lot of images and they could only be made so compact. Please be patient.)
You don't really appreciate how much you depend on your keyboard until it gives up. And of course, Murphy's Law dictates that this will happen at the worst possible time. Lots of folks keep a spare kb around, just for this reason. After all, they're not expensive. But a bit of maintenance and care can keep a keyboard functioning for much longer without any trouble at all.
People are forever giving me keyboards that they think are no longer serviceable. Some are truly at the end of any imaginable service life but, usually, the problem is simply a stuck or balky key. Most of the time, this is due to dust or perhaps some liquid which has at some time been spilled on it. If the liquid was particularly nasty (soda and milk spring to mind, here) the kb may indeed be trash, but usually, with careful cleaning, it can be restored to service.
My wife and I live in Texas, which is a particularly dusty place. Our situation is not helped by our home being located a couple hundred yards from a large working gravel pit, either. Dust in our computers and peripherals is a constant problem, compounded by our having two pets which shed unbelievable amounts of hair and the fact that we smoke in the house. I learned to clean and lubricate keyboards in self-defense and found it a good skill to have.
I'm going to apologize straight away for the photography. While serviceable enough, I would have liked it to be better lit. It is unfortunate that at the last minute, my grand plans for lighting the photography area (better known as our kitchen table) went awry.
It is ironic that the more expensive the keyboard, the harder it is to service. Higher quality keyboards have discrete switches soldered onto a printed circuit board which cannot be easily disassembled for service. Still, there is quite a bit one can do with these, to return them to good service. I'll detail disassembly of two types of keyboards, here. There are many, many variations in construction, but if you check out this page thoroughly, you should be able to handle any differences with aplomb.
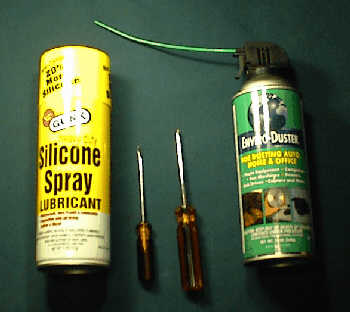
All you need to do this job is a screwdriver or two, a can of compressed air and (for the second type of kb I'll display only) a can of dry silicone spray lubricant. When working with any kind of screw, it is important the driver fit the screw head well; particularly so on keyboards, where the screws used tend to be of lesser quality and the heads easily damaged by a poorly fitting driver. Please take care with fitting the driver to the screw to avoid problems.
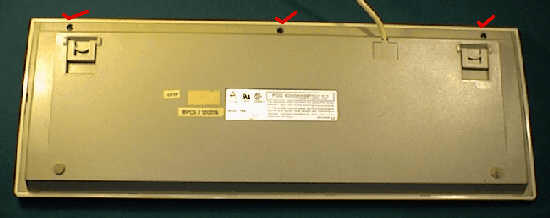
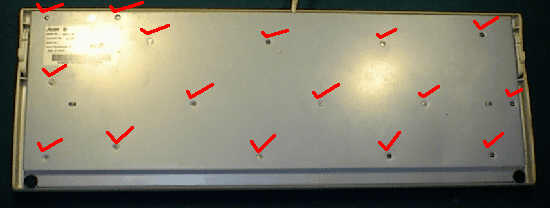
This is the keyboard from my Packard Bell 486, shown from the back. Though this kb is particularly dated, it's construction is typical of many 'up market' keyboards. The red marks denote screws which hold the back on. As you can see, there are only three. Once the screws are removed, a simple gentle pry with a flat-bladed screwdriver at the slots provided on the ends will free the front facing. This can then be washed with a damp cloth. Detergent may be used, if needed.
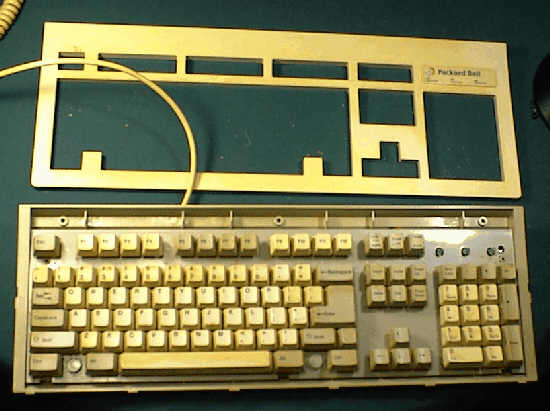
With the front facing removed, the printed circuit board to which the keys are afixed can be lifted from the backplate. Using the canned compressed air, you can blow each key mechanism clean in a minute or two. Usually, this is enough to free up any stuck keys. Persistently balky keys can be lubricated with minute amounts of light oil dispensed from a needle type oiler (available for a couple bucks at Radio Shack) though I have only rarely found this necessary. It is most important to do this very sparingly because oil in even very small quantities can damage a printed circuit board or disrupt the conductivity of the switch itself. Don't forget to lift the circuit board enough to blow out the dust, etc; underneath it, in the back plate.
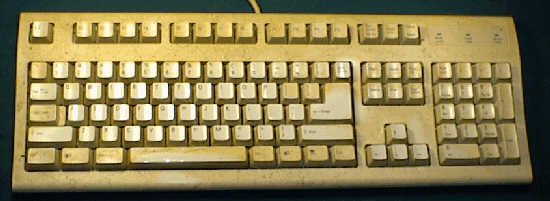
This is the keyboard from my primary computer. See how filthy it is? There are coffee stains, cigarette ashes, flecks of tobacco, dust and all sorts of pet hair on it. They don't get much messier than this and still work. This is a $10 Acer cheapie and quite typical of keyboards which come with 'bargain' systems. I've used this keyboard for six years, a minimum of 6 hours per day. The photograph does not show it, but there is a hole worn in the space bar where my thumb rests which was repaired with epoxy. The 'poison dots' on the 'j' and 'f' keys are worn completely away. It never misses a beat, though, and the action of it's keys suits me better than any other keyboard I've owned, which explains why I go to so much trouble keeping it running.
Where the last keyboard had only 3 screws holding the back on, this one has 16, noted again by the red marks. The back plate is thin steel; very flexible, and so needs many more screws than the solid plastic back plate type to keep things rigid in the interest of consistent key action. The screws are very small, so be careful not to lose them. Also, the screw heads are easily damaged, so be careful that your driver fits them well.
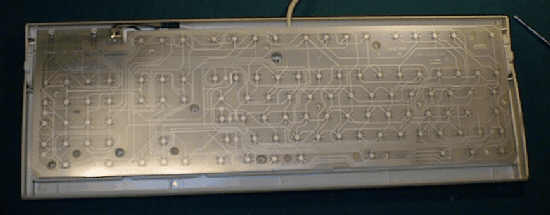
When all the screws are removed, the back plate comes off easily, revealing a flexible plastic printed circuit. This flexible part contains the actual switches which send data to the computer when you press a key. Note that it can only fit one way, so there's no chance of reinserting it incorrectly. It should lift out with no problem. Should it need cleaning, simply wipe it very gently with a soft cloth; not a paper towel, which could scratch it and so damage the conductors. I never use liquids of any sort on this part.
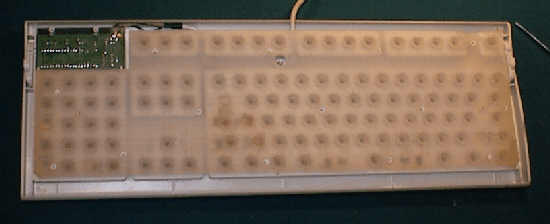
The next layer is a poly or rubber sheet. Into it are cast nubbins which, when the key is pressed, provide the 'spring' action to return the key to it's undepressed position. Should this be torn in any way, it needs replacement (if you have a donor kb around, you can't buy parts for these things) or you need a new keyboard. This can be washed off with warm water. Dishwashing detergent added to the water is okay, should you need it. Set this aside to dry thoroughly. Again, this piece fits only one way, so there's no chance of inserting it incorrectly on reassembly. In the upper left of the keyboard, you will see a printed circuit board to which the cord is connected. This will lift straight out or tilt out of position and so allow removal. This board may be blown off with compressed air, if need be, though I have never really found it necessary to do so.
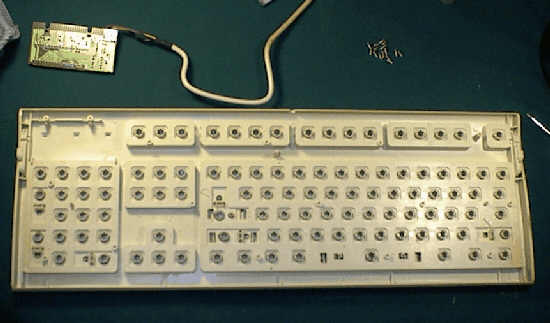
Now, you are left with the actual key mechanisms. This is where things stick and or wear out and so this is the part which needs our attention most.
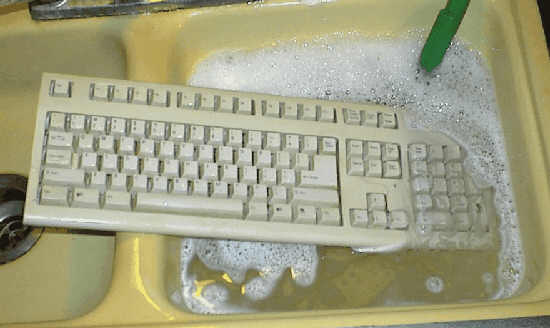
Yup. Just dunk it in the sink and clean every bit of it you can. Rinse thoroughly and shake as much water out of the works as you can. Then set this assembly aside to dry. I prop them in front of a fan and they usually dry within 20 minutes. Shaking the assembly gently once or twice during drying will speed the process considerably. If you're feeling really reckless and/or lazy, you can actually put this part in the dishwasher. I used to make a practice of that, until I put one in and the water jets blew all the keys out of their places, which took some doing to set right. The point is that this section of the kb is not delicate.
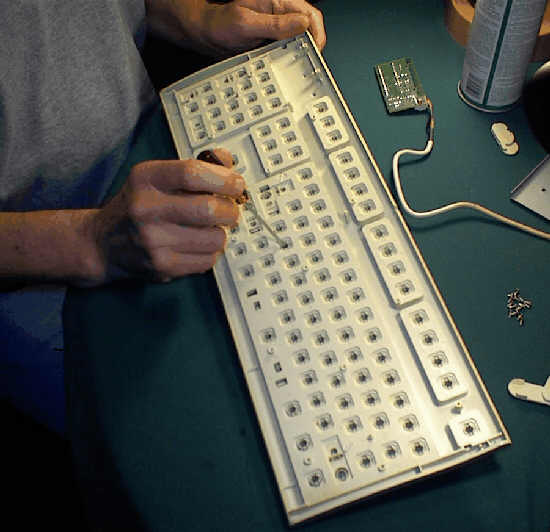
Should you need to remove individual keys from the assembly to clean underneath them, a simple gentle poke from the back side with a small screwdriver, as indicated in the above picture, will usually suffice to force them past the detents which hold them in place. Simply pushing them back into place will reassemble them after cleaning. The detents which hold the keys are small and easily overcome in either direction.
Once this assembly is clean and perfectly dry, spray the back very lightly with the silicone spray and wipe all excess off. Do not, under any circumstances, use oil or an oily spray like WD40. Likewise, graphite lubes are out as they can do real damage, possibly cause short circuits, and make a horrible mess. It's silicone or nothing for this job. The trace amounts of lubricant left after wiping are more than sufficient to lubricate the keys and make them feel as new. The lube will dry in a short while and the keyboard can be reassembled in the reverse order it came apart. Be certain to not over-tighten the screws as they are easily stripped. They need only be very slightly snug.
That's it! These simple steps have restored a lot of keyboards for me. You can do them, too. As you can see, it's simple. Just take your time and be gentle and all will turn out just fine.
Jack
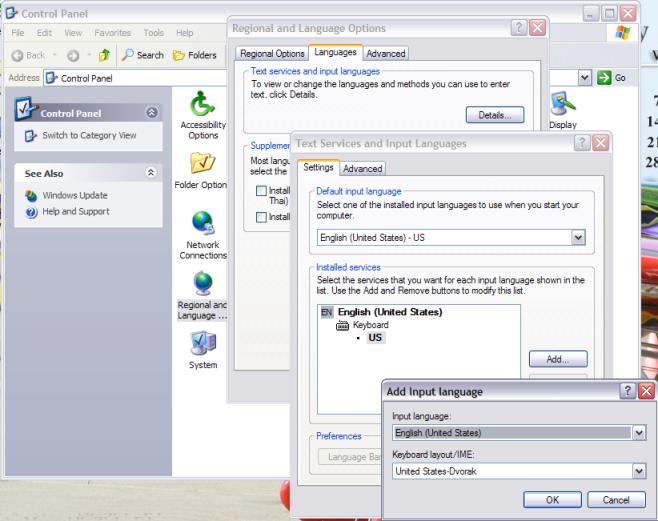
I'm just here with a quick note here about keyboard settings in Windows XP. While the basic settings for your keyboard are in the Control Panel "Keyboard" applet, the really fun stuff is in the "Regional and Language Options" It is a little hidden, but if you choose the languages tab and then select the Details button, you will get to the "Text Services and Input Languages" dialog. Just use the add button and the keyboard layouts of the world are yours.
If you don't actually have the physical keyboard you need -- especially when the keyboard layout is far different than the piece if hardware in front of you, you can use the On-Screen Keyboard which is one of Windows XP accessibility features.
Don't be afraid to experiment and have some fun with this hidden, but nifty feature.
Gail
© 2003 Jack Imsdahl and Gail Allinson
© 2002 - 2004 by On Computers and the Videotex Services Coalition.![]()